Copyright (c) 2016 g200kg
2016/02/09
KnobMan3Dはノブ画像を生成する事に特化した3Dモデリングツールです。 モデルの作成は3Dのオブジェクトの組み合わせで行いますが出力は3Dデータではなく画像ファイルとなります。 VSTプラグインの開発等で必要となるツマミの画像を繋げた「アニメーションノブ」のビットマップを作成できます。 各画像のフレームが垂直または水平に接続された1枚の画像、またはアニメーションGIF画像として出力できます。
KnobMan3D is a 3D modeling tool for knob-filmstrip-image design. Even the modeling is performed with combination of 3D objects, output will be done with 2D image files. Especially, aiming the 'Animation knob bitmap' that will be used in the VST audio effects/synth development. Each animation frame will be vertical / horizontal stitched, or combine to one AnimationGIF format.
作成サンプル:


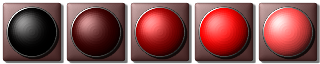
Samples:
ウェブアプリですのでブラウザでKnobMan3Dのページを開けば動作します。 ブラウザは Chrome / Firefox / Edge のいずれかで動作しますが、バージョンは最新版を使用してください。 なお、Mac の場合 Yosemite では正常に色が表示されない事があります。最新の El Capitan を使用してください。
また、最適化の関係で Firefox / Edge では動作が重くなる事があります。 Chrome を使用するか、Rendering paneの "Shadow" 設定を 0 にするとかなり症状が改善されます。
KnobMan3D is a web applicaiton, you need just a browser to access to the URL. Browser should be latest Chrome, Firefox or Edge. If you use Mac, latest 'El Capitan' is needed. May be some color will not be displayed normally in Yosemite.
Because of optimizing issue, Firefox or Edge might be slow response when editing parameters. Using Chrome or setting "Shadow" in Rendering pane to "0" might be a help.
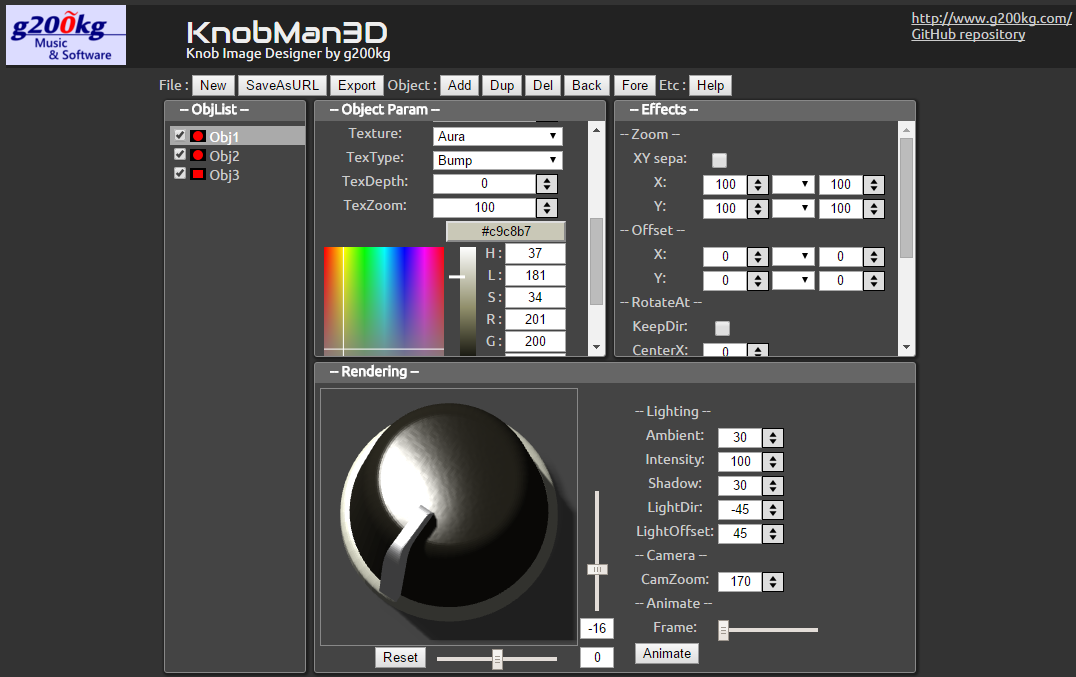
UI画面には4つに分けられたペインとコマンドメニューがあります。それぞれの役割は次のようになっています。
| Object list | 配置した基本オブジェクトのリストが表示されます。デフォルトでは3個のオブジェクトだけが表示されていますが、コマンドメニューの操作で追加する事ができます。 サポートされる最大オブジェクト数は32です。 |
| Object parameter | 基本オブジェクトの形状や色などをこのパラメータで編集できます。 |
| Effects | 基本オブジェクトに対して追加のエフェクトを付加するためのパラメータです。各フレームに対してノブが回転したり色が変化する等のアニメーションはこのパラメータで設定します。 |
| Rendering | 生成した結果の画像を表示します。またライティング等の全体的な設定もここで設定します。 |
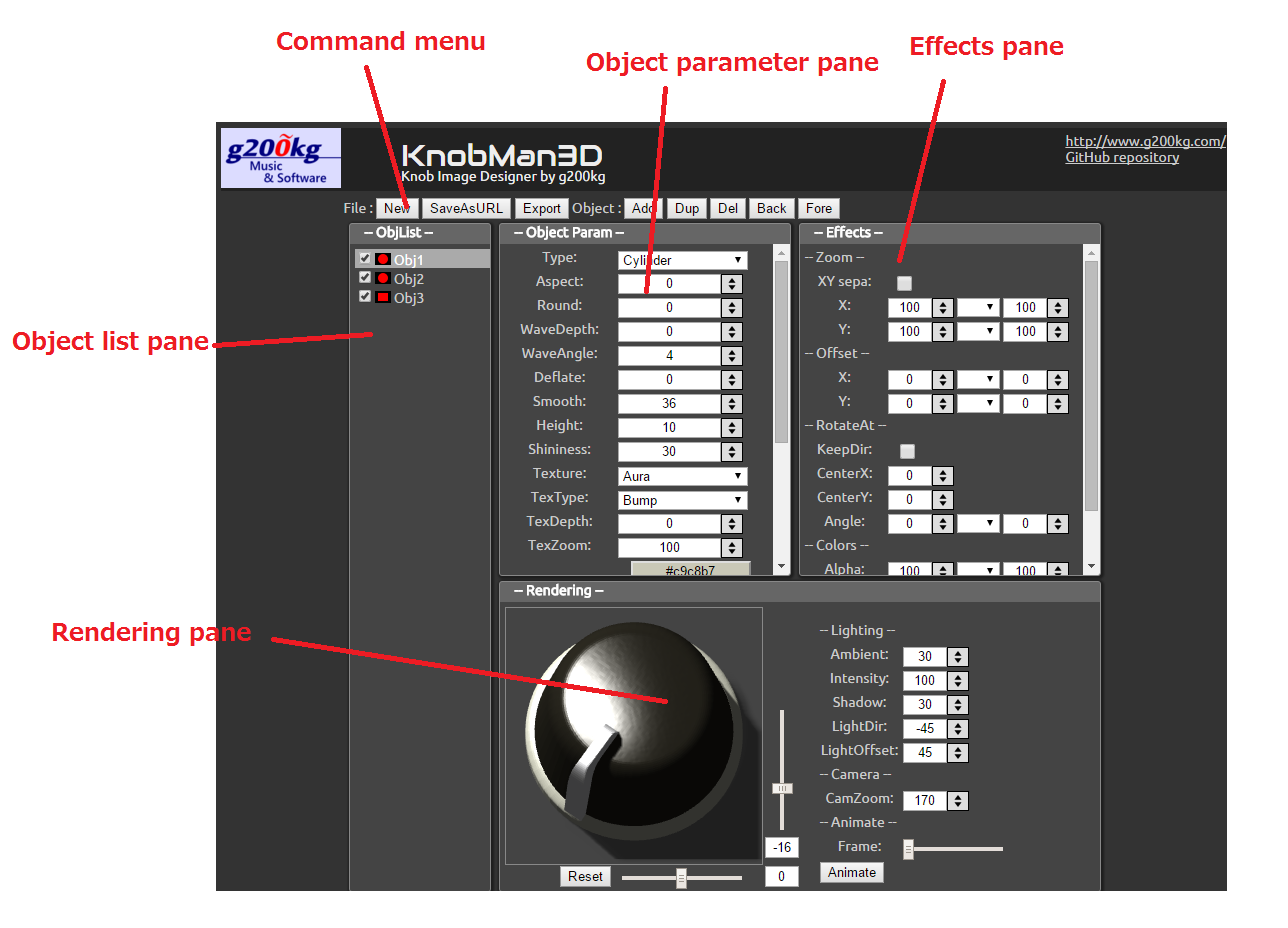
There are four panes and Command-menu in UI screen. Followings are description of these.
| Object list | The list of deployed basic objects. Though there are three objects in default, you can add objects by menu. Currently, maximum number of objects is 32. |
| Object parameter | The shapes or colors of basic objects settings. |
| Effects | Additional parameters for basic objects that allows animation e.g., rotations, color changing or so. |
| Rendering | Display the rendering result. Also it has global settings of lighting or camera. |

| コマンド | 説明 |
|---|---|
| New | 作成中のデータを消去します。 |
| Load | SaveAsURLコマンドで保存されたデータをロードするためのダイアログを開きます。URLが長くなりすぎてブラウザで直接開けない場合はこのダイアログからデータを読み込む事ができます。 |
| SaveAsURL | 作成中のデータを表すURL形式の保存データを表示します。このURLをブラウザで開く事でデータの編集を再開できます。 なおデータが複雑になりURLが長くなりすぎた場合はブラウザで直接開く事ができなくなります。この場合はLoadコマンドで開くダイアログにURLデータを貼り付ける事でロードできます。 |
| Export | PNGまたはアニメーションGIF形式で画像ファイルとして出力します。このコマンドを実行するとエクスポートの詳細を指定するダイアログが開きます。 |
| Add | オブジェクトを1つ追加します |
| Dup | 現在フォーカスしているオブジェクトを複製します。 |
| Del | 現在フォーカスしているオブジェクトを削除します。 |
| Back | 現在フォーカスしているオブジェクトをObjList上1つ上に移動します。 |
| Fore | 現在フォーカスしているオブジェクトをObjList上1つ下に移動します。 |
| Rename | オブジェクトに任意の名前を付けるためのダイアログを開きます。付けられた名前はObject List上に表示されます。 |
| Help | この画面を開きます。 |
| Command | Description |
|---|---|
| New | Clear current data. |
| Load | Open a dialog for data-load that saved by 'SaveAsURL' command. If the URL is too long for directl open with browser, you should paste the URL to this dialog. |
| SaveAsURL | Display current modeling data as a URL. Data can be load by opening this URL with a browser. Note that if the URL become too long to direct open with browser, you should use 'Load' command instead. |
| Export | Export rendering result as PNG or AnimationGIF. Detail dialog will be open with this button. |
| Add | Add an object. |
| Dup | Duplicate current focused object. |
| Del | Delete current focused object. |
| Back | Move current focused object up |
| Fore | Move current focused object down. |
| Rename | Rename the object. the name will be shown in 'Object List'. |
| Help | Open this page. |
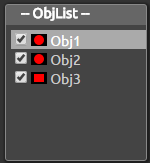
ここには使用している基本オブジェクトの一覧が表示されます。 1行だけ明るく表示されているのが現在フォーカスしているオブジェクトになり、各行をクリックする事で切り替える事ができます。 右側の Object parameter および Effects ペインには現在フォーカスされているオブジェクトの情報が表示されます。
各行の左にあるチェックボックスはそれぞれのオブジェクトの表示/非表示を切り替えます。
The list of object. The bright line indicate the current focused object. focused object can be switched by clicking these line. Object parameter and Effects pane right side will show current focused object parameters.
Check-box on left side switches show/hide of each object.
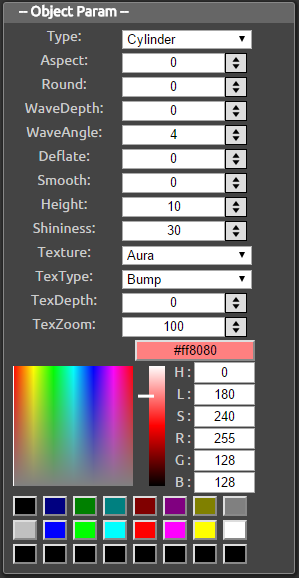
各オブジェクトの形状や色をこれらのパラメータで指定します。
| パラメータ | 説明 | ||||||
|---|---|---|---|---|---|---|---|
| Type | 基本形状を指定します。基本形状として "Cylinder"、"Cube"、"Circle" があります。
| ||||||
| DivR | オブジェクトの円周方向の分割数を指定します。 | ||||||
| DivH | オブジェクトの高さ方向の分割数を指定します。 | ||||||
| Aspect | 形状の(真上から見た時の)縦横比を設定します。
| ||||||
| Round | Cubeを真上から見た時の角を丸くします。このパラメータはCylinderでは無効です。
| ||||||
| Width | Circleの幅を指定します。Circle以外の形状では無効です。 | ||||||
| WaveDepth WaveAngle | Cylinderを真上から見た時の周囲を波打たせます。WaveDepthは波の振幅、WaveAngleは波の頂点の数を表します。Cubeに対しても有効ですが、Roundパラメータで角を丸めた部分にのみ効果があります。
| ||||||
| Deflate | 形状の上面を底面よりも小さくします。Cylinderならば円錐、Cubeならば四角錐に近づいてゆきます。
| ||||||
| Smooth | 形状の上面を滑らかな曲面にします。
| ||||||
| Height | 形状の高さ方向のサイズを指定します。
| ||||||
| Shininess | オブジェクトの光の反射の強さを指定します。
| ||||||
| Texture TexType TexDepth TexZoom | これら4つのパラメータはオブジェクト表面のテクスチャーを指定します。
| ||||||
| Color | HLSまたはRGBでオブジェクトの色を指定します。下部にはカラーパレットがあり、そこから選択する事もできます。カラーパレットをShift + クリックする事で現在の色をパレットに登録する事ができます。
|
The shapes or colors are determined by these parameters.
| Parameter | Description | ||||||
|---|---|---|---|---|---|---|---|
| Type | Specify the basic shape, "Cylinder", "Cube" or "Circle".
| ||||||
| DivR | Object division number of circumferential direction. | ||||||
| DivH | Object division number of height direction. | ||||||
| Aspect | Specify aspect ratio in X-Y plane (means from just above).
| ||||||
| Round | Round the corner (from just above) of 'Cube'. This parameter is not available in other shapes.
| ||||||
| Width | Circle width. This parameter is not available in other shapes. | ||||||
| WaveDepth WaveAngle | Waving effect of circumference of "Cylinder". WaveDepth is the amplitude of the wave, and WaveAngle is the number of peaks. This parameter also affect to "Cube" but only for "Rounded" corners.
| ||||||
| Deflate | Deflate the top face of the shape. It will come close to cone shape or pyramid shape.
| ||||||
| Smooth | Smoothen the top face.
| ||||||
| Height | Specify the height of the object.
| ||||||
| Shininess | Specify the reflection of the object.
| ||||||
| Texture TexType TexDepth TexZoom | These four parameters specifies the surface texture of the object.
| ||||||
| Color | Specify the object color using HLS or RGB. Color palete is also available. Use SHIFT+clicking to register color to palete.
|
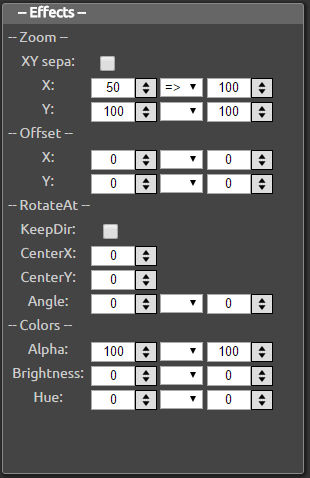
これらのパラメータは基本のオブジェクトに対してさらに変更を加えるもので、フレームに対応してノブが回転するなどのアニメーションを作成する事ができます。 パラメータの多くは2つの値の組になっています。 デフォルトでは左側の値(From)のみが使用されますが、中央のドロップダウンメニューで"=>"を選ぶと最初のフレームでは左の値、最後のフレームでは右の値が使用され、中間は自動的に補間されます。
| パラメータ | 説明 | ||||||
|---|---|---|---|---|---|---|---|
| Zoom X / Y / XYSepa | オブジェクトのサイズを変更します。デフォルトではXの値のみが使用されますがXYSepaにチェックを入れるとX方向とY方向を独立してコントロールできます。 |
||||||
| Offset X / Y | X方向およびY方向それぞれのオブジェクトの位置を変更します。 
|
||||||
| RotateAt KeepDir CenterX CenterY Angle |
オブジェクトを回転させます。CenterX / CenterY で回転の中心を指定し、Angleで回転の角度を指定します。KeepDirは未実装です。
|
||||||
| Alpha | オブジェクトの透明度を設定します。
|
||||||
| Brightness | オブジェクトの明るさを設定します。マイナスの場合は黒に近づき、プラスの場合は白に近づきます。
|
||||||
| Hue | オブジェクトの色相を設定します。-360または+360で一周して元の色に戻ります。
|
These parameters adding more effects to objects. It will makes animation frame by frame e.g. knob-rotation. Almost parameters are consist of pair of values. In default, the left side value will be used. And the value will be interporated between right side value according to frame when you select the '=>' on dropdown.
| Parameter | Description | ||||||
|---|---|---|---|---|---|---|---|
| Zoom X / Y / XYSepa | Scale the object size. The 'X' value is used for X and Y in default. X and Y value are independently controlled when checked the 'XYSepa' checkbox. |
||||||
| Offset X / Y | Offset the object position along to the X-axis or Y-axis.
|
||||||
| RotateAt KeepDir CenterX CenterY Angle |
Rotate the object. CenterX / CenterY specifies the center of rotation, and the Angle specifies the rotation in degree. KeepDir is not yet implemented.
|
||||||
| Alpha | Specifies the transparency of the object.
|
||||||
| Brightness | Specifies the brightness of the object color. Come close to black when negative value, and come close to white when positive value.
|
||||||
| Hue | Specifies the hue of the object color in degree. -360 or +360 means same color as original.
|
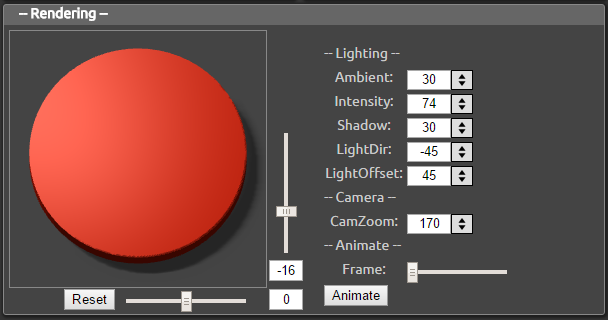
このペインにはレンダリングされた結果が表示されます。また、ライティング等の全体的な設定もここで行います。
| パラメータ/コマンド | 説明 | ||||||
|---|---|---|---|---|---|---|---|
| 画像の右/下のスライダーおよび数値 | カメラの位置を設定します。 | ||||||
| Reset | カメラの位置を中央真上に設定します。 | ||||||
| Ambient | 周辺の明るさの設定です。0の場合はライトの当たっていない部分が完全に黒になります
| ||||||
| Intensity | 一定の方向から当てるライトの強さです。
| ||||||
| Shadow | 背景に落ちる影の強さです。0の場合はノブから背景に対して落ちる影が生成されません。なお、この影の処理を0以外の値にすると(特にFirefox/Edgeでは)かなり重くなります。
| ||||||
| LightDir | XY平面上で見たライトの方向です。
| ||||||
| LightOffset | 真上からLightDirで示す方向に向けてライトを傾ける角度です。0で真上、90で真横になります。
| ||||||
| CamZoom | 複数のオブジェクトで構成したシーン全体を拡大/縮小します。
| ||||||
| Frame / Animation | スライダーを移動するとEffectsの設定に従ってアニメーションされた各フレームを表示します。またAnimationボタンを押すと、自動的にアニメーションされます。
|
This pane diplay the rendering result. Also has parameters of global lighting etc.
| Parameter / command | Description | ||||||
|---|---|---|---|---|---|---|---|
| The sliders and values right/bottom of the rendered image. | Specifies the camera potition. | ||||||
| Reset | Reset the camera position to just above. | ||||||
| Ambient | Ambient light intensity. If 0, the faces out of light direction will be complete black.
| ||||||
| Intensity | Directional light intensity.
| ||||||
| Shadow | Shadow density for background. If 0, The objects will not cast shadow to background plane. Note that this option will needs fairly CPU (especially in Firefox / Edge).
| ||||||
| LightDir | Light direction in X-Y plane.
| ||||||
| LightOffset | Light direction from just above to LightDir direction. 0 means just above, and 90 means edge-on.
| ||||||
| CamZoom | Scale the whole scene constructed with multiple objects.
| ||||||
| Frame / Animation | Display animated frames according to Effects parameters. The iamge will be automatically animated when the Animation button is pressed.
|
Copyright (c) 2016 g200kg
http://www.g200kg.comKnobMan3D : licensed under MIT License.
Sample knobs : licensed under Creative Commons Zero CC0
THREE.js : MIT License
https://github.com/mrdoob/three.js/blob/master/LICENSE
jsgif (GIFEncoder.js/NeuQuant.js/LZWEncoder.js) :
https://github.com/antimatter15/jsgif/blob/master/LICENSE


